I LOVE home made bread, it's something that for me feels so homely, the smell especially is one thing you definitely don't get from Tesco! I think it's one of the things that is SO much better home made than shop bought, you can really taste the difference! The steps below might look a bit daunting at first glance, but when you've mastered the kneading and shaping of the dough it really is so simple, and so rewarding.
Despite my love for a home made loaf I don't bake it as often as I would like because it rarely has time to cool properly before half the loaf is demolished with a good helping of butter...Perfect but it doesn't leave much for lunch the next day!
Makes 1 Loaf
500g Strong White Bread Flour
20g Butter- Softened
10g Salt
10g Sugar
7g (1 sachet) Dried, Fast Action Yeast
340ml Tepid Water
Method-
1) Put the flour, butter, salt, sugar, and yeast into a large mixing bowl (Putting the yeast and salt on opposite sides, as salt can kill the yeast)- Rub in the flour and then mix the rest of the ingredients through.
2) Make a slight dip in the centre on the flour and pour in about 300ml of the water and mix into the flour using your fingers.
3) At this point you might need to add the rest of the water. What you need is for all of the flour to be incorporated, the sides of the bowl to be clean of flour etc and for the dough to feel soft and squidgy to the touch, but not sticky or wet.
4) Lightly flour your worktop, turn the dough out onto it and knead the dough for 10 minutes.- To knead the dough use the ball of your hand to push down onto the dough and then push it away from you (This might be easier if you hold the dough with your other hand). Then roll the stretched dough back in, turn it it 45 degrees and repeat, you need to do this for 10 minutes to stretch the gluten in the dough.
5) Lightly oil a bowl, put in your dough, cover with cling film and leave it to prove (double in size-Ideally somewhere that is slightly warm). This usually takes between 1 and 2 hours.
6) When your dough has doubled in size you need to turn it out onto a floured surface and "Knock it back" to do this you need to knead it in the same way as above to, until all the air has been knocked out.- Usually only a minute)
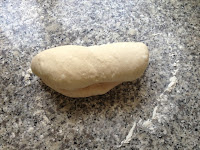
7) Next you need to shape your dough, this can be done in a variety of ways and there are loads of videos on the internet that will help you, but probably the simplest way is to shape it into a round loaf. To do this lightly flatten the dough with the ball of your hands, then roll the dough up. Turn it 45 degrees and repeat. Then using your whole hand, keep contact with the slide of the dough, turning it with your hand. This will smooth the dough and you should start to get a round ball of dough!
8) Line a baking tray with greaseproof paper and place your dough on this, then cover it with lightly oiled cling film and let it prove again- This shouldn't take as long this time- Usually 30-45 minutes.
9) While your dough is having its second prove, preheat your oven to 220C.
10) When your dough has doubled in size again, dust with flour and slash the top if you want to using a serated knife.
11) Bake in the oven for 25-30 minutes. Or until the top is a golden brown and if you tap the bottom of the loaf it sounds hollow. Then put it on a wire rack to cool completely (If you can leave it alone for that long- If not I suggest a good helping of butter and a cup of tea!)
 |
| Adding the ingredients |
 |
| Mixing the dough |
 |
| Mixing the dough |
 |
| Mixing the dough |
 |
| Before the first prove |
 |
| After the first prove |
 |
| Shaping the dough |
 |
| Shaping the dough |
 |
| Shaping the dough |
 |
| Shaping the dough |
 |
| Shaping the dough |
 |
| After the second prove |
If you need any advise with the kneading, shaping or any other aspect of this recipe please let me know and I'll try my best to help you out :) ...Happy Baking!


could I have that with some cheese and chutney?
ReplyDelete